Solar, Demand Charges, Home Assistant, and Mission Creep: A Trip Down the Rabbit Hole
This article contains affiliate links for products I am using.
A few years ago I added solar panels to my home. One of the things I studied was how to get the best payback from them. We have APS, Arizona Public Service, here in Scottsdale, and the rate plan they recommended was, of course, the wrong one.
After running the numbers, I discovered the best plan for our all-electric home wasn’t the standard plan or even the regular Time of Use plan. It was the Time of Use plan with a Demand Charge. Under that plan, off-peak electricity costs only about $0.06/kWh, but there is an additional demand charge of roughly $20 per kW during the summer and $14 per kW during the winter.
What does this mean in practical terms?
If you decide to bake a cake during peak hours and your oven is electric, that single event could effectively cost you $100. Not every time you bake, but once a month. APS looks at your highest power demand during peak hours and charges accordingly. If your home suddenly draws a large amount of power, that demand charge can become painful.
That creates a strong incentive to keep peak demand as low as possible.
My home was all electric, so the first thing I did was move major loads away from the 4 PM to 7 PM peak period. Water heaters got timers. Smart thermostats pre-cooled or pre-heated the house before 4 PM and then shut down until 7 PM. I even put a sign on the clothes dryer: “DO NOT USE BETWEEN 4-7 PM.”
Eventually we remodeled the kitchen and replaced the electric ovens with propane. The demand charge problem became much easier to manage.
SmartThings and the First Load Controller
Then I discovered Samsung SmartThings.
SmartThings runs in the cloud and is controlled from your phone. It allows simple automations and scripting. To monitor power use, I installed an Eyedro energy monitor with current transformers on both utility legs and another on the solar production feed.
With a little configuration, SmartThings could see in real time what the house was consuming and what the solar system was producing.
For a while, it worked great.
I had automations that essentially said:
If solar production exceeds house consumption by enough margin, continue running the air conditioning even during peak hours.
In June, our solar production often carried the AC load until 6:00 or 6:30 PM without significantly impacting demand charges.
Then things started breaking.
The Eyedro integration would periodically disappear and need to be removed and re-added. Support blamed Samsung. Samsung blamed integration changes. Then came promises that fixes were being worked on.
Meanwhile, my automation stopped working.
I had at least one month where the demand charge was painful because the cloud-based automation failed.
That was when I learned an important lesson:
Anything that can cost me real money needs to keep working even when someone else’s cloud service has a bad day.
Enter Home Assistant
At that point I started talking to ChatGPT about replacing my SmartThings-based load controller.
That conversation led me to Home Assistant.
As a long-time firmware developer, the idea appealed to me immediately. Home Assistant could run entirely locally on my own hardware.
After some research, I bought a small Ryzen-based mini PC with 16 GB of RAM and a 512 GB SSD and eventually added another 1 TB drive. This is the mini PC I used, though prices have changed since I bought mine.
The machine arrived with Windows installed. With ChatGPT acting as a knowledgeable but often drunk assistant, I replaced Windows with Proxmox.
Proxmox is a headless virtualization platform that allows multiple operating systems to run simultaneously. On it, I created a Home Assistant virtual machine and started building.
The first challenge was data.
I already had an Enphase solar system, a Sense monitor, and an Eyedro monitor. The problem was that nearly everything depended on cloud services.
The Enphase integration wasn’t ideal for my needs. Sense was cloud dependent. Eyedro was cloud based too.
But then ChatGPT and I discovered something interesting.
The Eyedro device exposed a JSON endpoint containing real-time measurements from all three current transformers. Suddenly I had direct access to the data I needed without relying on a cloud service.
That became the foundation of my custom load controller.
Controlling Loads
The next challenge was controlling the air conditioning systems.
We have a larger home with three AC units plus a couple of evaporative coolers. As long as humidity remains reasonable, we use the evaporative coolers from roughly October through June.
Years earlier I had installed Sensi thermostats and had been extremely happy with them. Better yet, Home Assistant already had integrations that allowed local control without requiring the cloud.
For the evaporative coolers, I needed a simple 24-volt relay controller. A $14 Tuya module turned out to be perfect.
The Tuya ecosystem works surprisingly well with Home Assistant and can be operated entirely locally.
I also wanted:
- Selectable load-shed priority
- Holiday awareness so APS power holidays wouldn’t trigger unnecessary load shedding
- Real-time visibility into solar production and home consumption
- Notifications when loads were being shed
Eventually my dashboard looked like this.
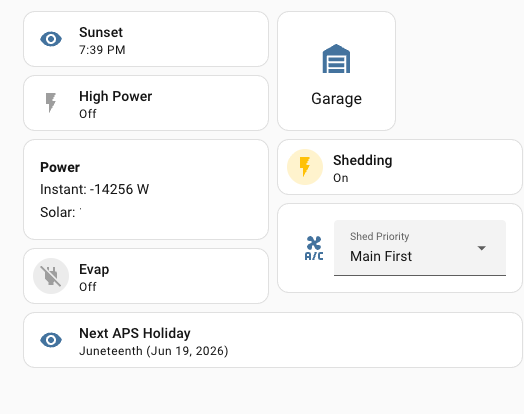
I even added garage door control so I could open and close the garage while walking the dogs without entering codes on the exterior keypad.
Mission creep had officially begun.
The Logic
What does the load controller actually do?
Nothing that a conventional load controller could ever accomplish.
If it is not an APS holiday:
- If it is between 4 PM and 7 PM on a weekday:
- If solar generation minus home consumption falls below a threshold:
- Shed a load
- Shed either the guest house AC or main house AC based on priority settings
- Continue shedding loads as necessary
- If solar generation minus home consumption falls below a threshold:
- If power usage falls back below the threshold:
- Restore loads in reverse order
The actual logic is more sophisticated than that, but you get the idea.
The load-shedding strategy can be as simple or as complex as I want it to be.
I tell ChatGPT what I want, it helps write the automation, and then I test it.
The result has been remarkably effective.
Since implementing the system, my typical demand charge is around 0.9 kW. Occasionally it reaches 1.5 kW, but that’s rare. I don’t mind paying a $20-$30 demand charge if the rest of my electricity costs only six cents per kilowatt-hour.
Between EV charging, pool equipment, air conditioning, and normal household loads, our power usage is substantial. The savings more than justify the effort.
The Beginning of the Rabbit Hole
What started as a way to reduce electric bills became something much larger.
At the time, I thought I was building a load controller.
I had no idea I was laying the foundation for pool automation, solar monitoring, garage controls, security systems, remote property management, WireGuard tunnels, ESP32 controllers, and eventually a network of Home Assistant installations spanning multiple properties in multiple states.
The load controller solved the original problem.
The rabbit hole was just beginning.
In the next article, I’ll show how I used Home Assistant to build solar production and consumption dashboards that make it easy to understand exactly what the system is doing in real time.